


To send your first Kimi API request, create an API key on the international Kimi Open Platform, add at least $1 of balance, store the key in the MOONSHOT_API_KEY environment variable, and send a Chat Completions request to https://api.moonshot.ai/v1/chat/completions. For SDKs, use https://api.moonshot.ai/v1 as the base URL. Start with kimi-k3, set a small max_completion_tokens value, and read the final answer from choices[0].message.content. Never place the API key in browser JavaScript or a public repository.
Model IDs, access rules, rate limits and request parameters can change. Check the live Kimi Open Platform model list and official documentation before deploying production traffic.
The reliable first-request path:
Create key → add balance → store the secret → check balance → list available models → send a small request → inspect the answer and token usage.
Kimi API Quickstart at a Glance
| Checkpoint | What to do | Successful result |
|---|---|---|
| 1. Platform | Use the international Kimi Open Platform | Your key matches api.moonshot.ai |
| 2. API key | Create a key inside a project | The secret is stored outside your code |
| 3. Balance | Complete the required top-up | available_balance is greater than 0 |
| 4. Environment | Set MOONSHOT_API_KEY | Your terminal or server process can read it |
| 5. Model | Call GET /v1/models | kimi-k3 appears for the account |
| 6. Request | Call POST /v1/chat/completions | HTTP 200 with a non-empty choices array |
| 7. Output | Read message.content | The expected answer is returned |
| 8. Usage | Inspect the usage object | Token counts are recorded for monitoring |
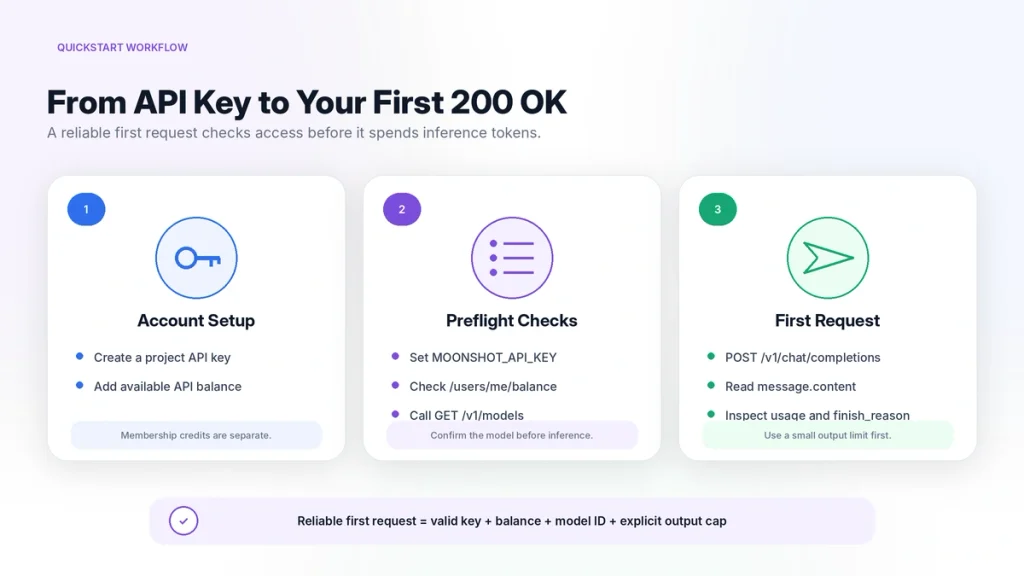
The first test should run from a terminal, backend application or server-side script. Do not send a permanent Kimi API key directly from public browser code.
Which Kimi API Does This Guide Use?
This tutorial uses the international, pay-as-you-go Kimi Open Platform:
- Developer platform:
platform.kimi.ai - SDK base URL:
https://api.moonshot.ai/v1 - Chat endpoint:
https://api.moonshot.ai/v1/chat/completions - Authentication:
Authorization: Bearer $MOONSHOT_API_KEY - Billing: pay-as-you-go API balance
It is separate from:
- Kimi consumer membership.
- Kimi Chat credits.
- Kimi Code subscription quotas.
- Keys created on another regional Kimi platform.
- OpenRouter, Together AI or another third-party provider.
A key from one Kimi platform is not automatically valid on another. Use a key created on the international platform with the api.moonshot.ai endpoint.
What You Need Before the First Request
- A Kimi Open Platform account.
- An API key from the correct project.
- Available pay-as-you-go balance.
- cURL, Python 3.9+ or Node.js 18+.
- OpenAI SDK 1.0 or later when using Python or Node.js.
- A terminal or server-side development environment.
Using Python 3.9 or later is the safest baseline for the current K3 examples. Create a clean virtual environment when adding Kimi to an existing Python project:
python3 -m venv .venv

# macOS or Linux
source .venv/bin/activate

# Windows PowerShell
.venv\Scripts\Activate.ps1

python -m pip install --upgrade pip
python -m pip install "openai>=1.0"
For Node.js:
mkdir kimi-api-quickstart
cd kimi-api-quickstart

npm init -y
npm install openai@latest
Create a Kimi API Key
- Open the international Kimi Open Platform.
- Sign in to the intended account.
- Select the default project or create a dedicated development project.
- Open the API Keys area.
- Create a new key with a descriptive name such as
local-quickstart. - Copy the key into a password manager or secret-management system.
- Do not paste it into source code, screenshots, support tickets or public chat messages.
For production, use separate keys for development, staging and production. This makes rotation, budget tracking and incident response easier.
Add Balance Before Calling Kimi K3
The current international Kimi Open Platform requires a successful top-up of at least $1 before inference access begins. Your cumulative top-up also influences the account’s rate-limit tier.
This balance is separate from:
- Kimi Membership credits.
- Kimi Code subscription quota.
- A third-party provider balance.
- Credits shown inside another Kimi region or product.
Do not test the Chat Completions endpoint repeatedly when the balance is zero. Check the balance directly first.
Store the Key in an Environment Variable
macOS or Linux
export MOONSHOT_API_KEY="YOUR_KIMI_API_KEY"Confirm that the variable exists without printing the complete secret:
if [ -n "$MOONSHOT_API_KEY" ]; then
  echo "MOONSHOT_API_KEY is set"
else
  echo "MOONSHOT_API_KEY is missing"
fi
Windows PowerShell
$env:MOONSHOT_API_KEY = "YOUR_KIMI_API_KEY"

if ($env:MOONSHOT_API_KEY) {
    Write-Output "MOONSHOT_API_KEY is set"
} else {
    Write-Output "MOONSHOT_API_KEY is missing"
}
An environment variable created this way normally lasts for the current terminal session. Use your operating system’s secure secret management or deployment platform for persistent production credentials.
When using a .env file, add it to .gitignore:
.env
.env.*
!.env.example
Preflight Check 1: Verify the API Balance
Call the balance endpoint before creating a completion:
curl https://api.moonshot.ai/v1/users/me/balance \
  -H "Authorization: Bearer $MOONSHOT_API_KEY"
A successful response contains values similar to:
{
  "code": 0,
  "data": {
    "available_balance": 5.0,
    "voucher_balance": 0.0,
    "cash_balance": 5.0
  },
  "scode": "0x0",
  "status": true
}
Check data.available_balance. When it is less than or equal to zero, inference requests cannot continue and normally return exceeded_current_quota_error.
This request also tests whether:
- The environment variable is available.
- The Authorization header is correctly formed.
- The key matches the international endpoint.
- The account is active.
Preflight Check 2: List the Models Available to Your Account
Do not copy a model name from an old tutorial and assume that your account can use it. Query the current model list:
curl https://api.moonshot.ai/v1/models \
  -H "Authorization: Bearer $MOONSHOT_API_KEY"
The response contains a data array. Each model object can include:
id.context_length.supports_image_in.supports_video_in.supports_reasoning.
Confirm that kimi-k3 appears before sending the first K3 request. If it does not appear, check the account tier, top-up status and current model availability.
Send Your First Kimi API Request with cURL
This request uses a small reasoning setting and a controlled output limit so the first test remains quick and inexpensive:
curl https://api.moonshot.ai/v1/chat/completions \
  -H "Authorization: Bearer $MOONSHOT_API_KEY" \
  -H "Content-Type: application/json" \
  -d '{
    "model": "kimi-k3",
    "reasoning_effort": "low",
    "max_completion_tokens": 512,
    "messages": [
      {
        "role": "system",
        "content": "You are a concise API assistant. Reply in English."
      },
      {
        "role": "user",
        "content": "Return one sentence confirming that this API request worked."
      }
    ]
  }'
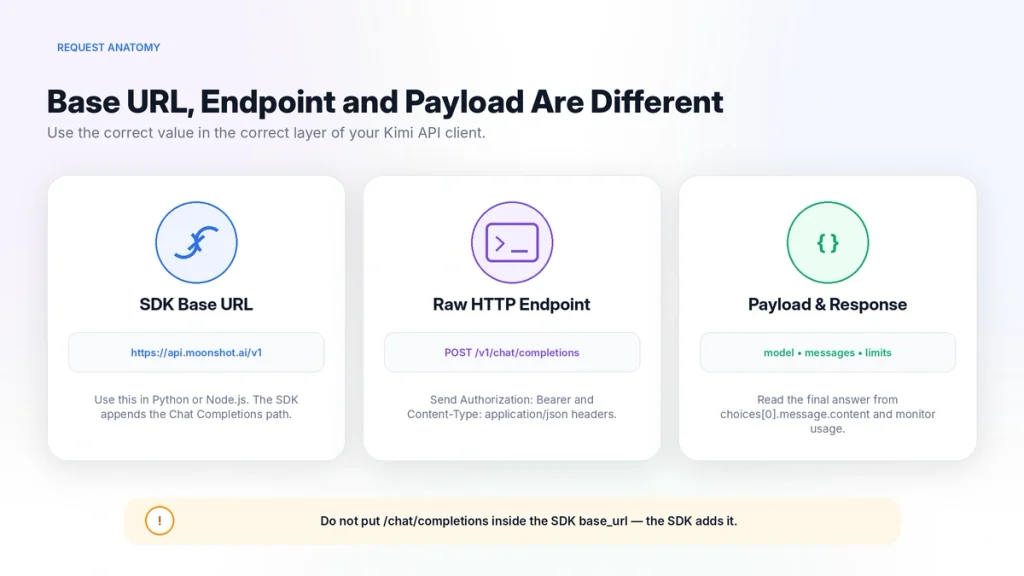
There are two URL rules to remember:
- Raw HTTP or cURL: use the full endpoint
https://api.moonshot.ai/v1/chat/completions. - OpenAI SDK: use
https://api.moonshot.ai/v1asbase_url; the SDK appends the Chat Completions path.
Do not set the SDK base URL to the complete /chat/completions endpoint. Doing so can cause the client to append the path twice.
Understand the First Response
A successful non-streaming response follows an OpenAI-compatible structure similar to:
{
  "id": "chatcmpl-example",
  "object": "chat.completion",
  "created": 1234567890,
  "model": "kimi-k3",
  "choices": [
    {
      "index": 0,
      "message": {
        "role": "assistant",
        "content": "The Kimi API request completed successfully.",
        "reasoning_content": "..."
      },
      "finish_reason": "stop"
    }
  ],
  "usage": {
    "prompt_tokens": 42,
    "completion_tokens": 31,
    "total_tokens": 73,
    "cached_tokens": 0
  }
}
The most important fields are:
| Field | Meaning |
|---|---|
id | Identifier for the completion response |
model | The model that processed the request |
choices[0].message.content | The final user-facing answer |
choices[0].message.reasoning_content | Reasoning content that may be returned by a thinking model |
finish_reason | Why generation stopped; normally stop for a complete answer |
usage.prompt_tokens | Input tokens processed |
usage.completion_tokens | Generated output, including billable reasoning where applicable |
usage.cached_tokens | Input tokens served through context caching |
Use message.content as the normal answer. Do not replace the final answer with reasoning_content.
Send the First Request with Python
Install the SDK:
python -m pip install --upgrade "openai>=1.0"Create a file named first_request.py:
from __future__ import annotations

import os
import sys

from openai import APIConnectionError, APIStatusError, OpenAI


def main() -> int:
    api_key = os.environ.get("MOONSHOT_API_KEY")
    if not api_key:
        print(
            "MOONSHOT_API_KEY is not set. "
            "Create the environment variable before running this script.",
            file=sys.stderr,
        )
        return 1

    client = OpenAI(
        api_key=api_key,
        base_url="https://api.moonshot.ai/v1",
        timeout=60.0,
        max_retries=2,
    )

    try:
        completion = client.chat.completions.create(
            model="kimi-k3",
            reasoning_effort="low",
            max_completion_tokens=512,
            messages=[
                {
                    "role": "system",
                    "content": "You are a concise API assistant. Reply in English.",
                },
                {
                    "role": "user",
                    "content": (
                        "Return one sentence confirming that "
                        "this Python API request worked."
                    ),
                },
            ],
        )
    except APIConnectionError as exc:
        print(f"Connection error: {exc}", file=sys.stderr)
        return 2
    except APIStatusError as exc:
        print(
            f"Kimi API returned HTTP {exc.status_code}: {exc}",
            file=sys.stderr,
        )
        return 3

    message = completion.choices[0].message

    print("Final answer:")
    print(message.content or "[No final content returned]")

    reasoning = getattr(message, "reasoning_content", None)
    if reasoning:
        print("\nReasoning content was returned by the model.")

    if completion.usage:
        print("\nUsage:")
        print(f"Prompt tokens: {completion.usage.prompt_tokens}")
        print(f"Completion tokens: {completion.usage.completion_tokens}")
        print(f"Total tokens: {completion.usage.total_tokens}")

    return 0


if __name__ == "__main__":
    raise SystemExit(main())
Run it:
python first_request.pyThis example validates the environment variable, sets a timeout, permits limited SDK retries, prints the final answer and records token usage.

Send the First Request with Node.js
Install the SDK:
npm install openai@latestCreate first-request.mjs:
import OpenAI from "openai";

const apiKey = process.env.MOONSHOT_API_KEY;

if (!apiKey) {
  console.error(
    "MOONSHOT_API_KEY is not set. " +
    "Create the environment variable before running this script."
  );
  process.exit(1);
}

const client = new OpenAI({
  apiKey,
  baseURL: "https://api.moonshot.ai/v1",
  timeout: 60_000,
  maxRetries: 2,
});

async function main() {
  try {
    const completion = await client.chat.completions.create({
      model: "kimi-k3",
      reasoning_effort: "low",
      max_completion_tokens: 512,
      messages: [
        {
          role: "system",
          content: "You are a concise API assistant. Reply in English.",
        },
        {
          role: "user",
          content:
            "Return one sentence confirming that this Node.js request worked.",
        },
      ],
    });

    const message = completion.choices[0]?.message;

    console.log("Final answer:");
    console.log(message?.content ?? "[No final content returned]");

    if (message?.reasoning_content) {
      console.log("\nReasoning content was returned by the model.");
    }

    if (completion.usage) {
      console.log("\nUsage:");
      console.log(completion.usage);
    }
  } catch (error) {
    if (error instanceof OpenAI.APIError) {
      console.error(`Kimi API error ${error.status}: ${error.message}`);
    } else {
      console.error(error);
    }
    process.exitCode = 1;
  }
}

await main();
Run the file:
node first-request.mjsWhich Kimi Model Should You Use?
| Model ID | Start with it when | Important behavior |
|---|---|---|
kimi-k3 | You want the current flagship for reasoning, coding or knowledge work | Thinking is always enabled; use reasoning_effort |
kimi-k2.7-code | The task is focused on code generation, editing or programming agents | Thinking and Preserved Thinking remain enabled |
kimi-k2.7-code-highspeed | You need faster hosted output for coding | Uses higher token rates than the standard variant |
kimi-k2.6 | You need a general-purpose model with switchable thinking | The Kimi-specific thinking object is passed through extra_body in the OpenAI SDK |
Use kimi-k3 for this Quickstart. Before changing models, review our Kimi API model comparison, because the supported Parameters differ between model families.
Kimi K3 Parameter Rules for the First Request
| Parameter | How to use it with K3 |
|---|---|
model | Set to kimi-k3 |
reasoning_effort | low, high or max; the current default is max |
thinking | Do not send it; this is a K2.x-style parameter |
max_completion_tokens | Set an explicit limit such as 512 or 1,024 for the initial test |
temperature | Fixed for K3; do not try to override it |
top_p | Fixed for K3; omit it |
n | Fixed at 1 |
K3’s default max_completion_tokens is large. A small explicit limit is safer for a first request because it limits unexpected output and reduces the token amount used for rate-limit admission.
Do not copy temperature, thinking or other Parameters from an old K2 tutorial into a K3 request without checking the current Parameter Reference.
How to Validate That the First Request Really Worked
- The HTTP response is 200.
- The response contains a non-empty
choicesarray. choices[0].message.contentcontains the expected answer.finish_reasonis normallystop.- The returned
modelmatches the intended model. - The
usageobject is present. - Your logs do not contain the complete API key.
- The request did not accidentally use a third-party endpoint.
- The token count is reasonable for the test.
- The output cap is explicit rather than relying on a large default.
For an automated smoke test, assert that:
assert completion.choices
assert completion.choices[0].message.content
assert completion.choices[0].finish_reason in {"stop", "length"}
assert completion.usage is not None
assert completion.usage.total_tokens > 0
A status code of 200 only confirms that the API accepted and processed the request. It does not prove that the answer is factually correct or suitable for production.
Common Kimi API Quickstart Errors
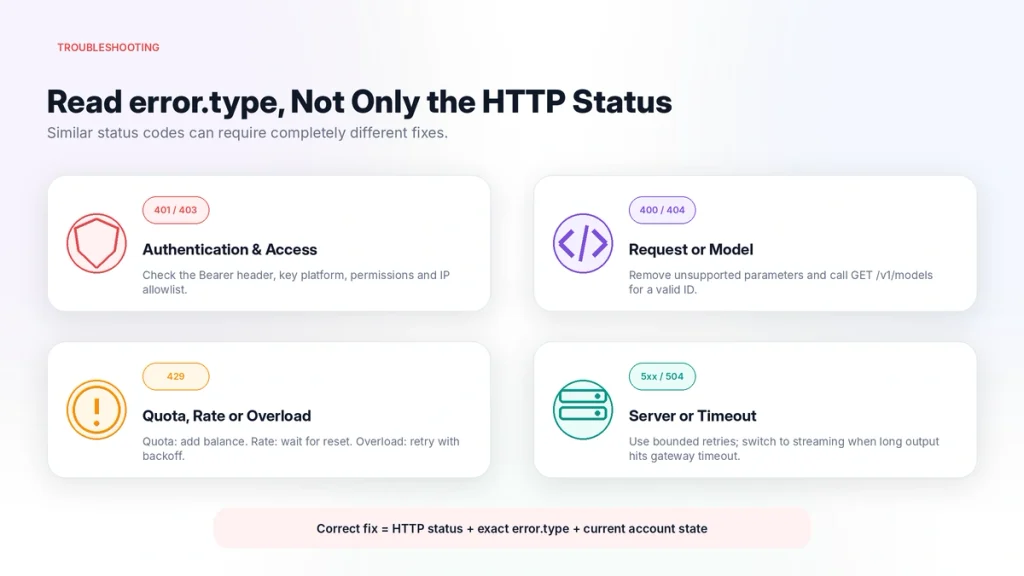
| Error | Likely cause | Recommended action |
|---|---|---|
| Environment variable missing | The terminal or application cannot read MOONSHOT_API_KEY | Set the variable in the same environment that runs the code |
401 invalid_authentication_error | Malformed or invalid key | Check the Bearer header and rotate the key if necessary |
| 401 with a valid-looking key | The key belongs to a different Kimi platform or region | Match the key source with api.moonshot.ai |
403 permission_denied_error | Missing product permission or IP whitelist mismatch | Review organization permissions and the public egress IP |
404 resource_not_found_error | Misspelled model ID or no account access | Call GET /v1/models and use an available ID |
429 exceeded_current_quota_error | Insufficient balance or token quota | Check the balance endpoint and billing status |
429 rate_limit_reached_error | Concurrency, RPM, TPM or TPD limit | Reduce traffic, wait for reset or review the account tier |
429 engine_overloaded_error | Temporary server-side capacity pressure | Respect Retry-After and retry with exponential backoff; topping up does not fix this error |
| 500 or503 | Temporary server problem | Retry later with bounded backoff |
| 504 | A long non-streaming request produced no response before the gateway timeout | Use streaming for long generations |
| Duplicated URL path | The SDK base URL includes /chat/completions | Use only https://api.moonshot.ai/v1 as the SDK base URL |
invalid_request_error | An unsupported Parameter was copied from another model | Review the model-specific Parameter Reference |
For the complete diagnostic flow, see Kimi API Errors and Troubleshooting Guide.
Protect the Kimi API Key
- Never place the key in public browser JavaScript.
- Never embed it in a WordPress shortcode rendered to the frontend.
- Never commit it to Git.
- Never include it in a mobile application bundle.
- Do not print the complete key in logs.
- Use separate development and production keys.
- Rotate a key immediately after accidental exposure.
- Restrict project budgets and rate limits.
- Use an IP allowlist only when your network egress is stable and understood.
- Remove keys belonging to former team members.
Safe WordPress architecture
A WordPress chat or AI tool should use this flow:
- The browser sends the user’s prompt to a protected WordPress REST or AJAX endpoint.
- The server authenticates or rate-limits the request.
- WordPress reads the Kimi key from server-side configuration.
- The server calls
api.moonshot.ai. - The server returns only the required response data to the browser.
- The complete API key never reaches HTML, JavaScript or localStorage.
Rate limiting, input limits, abuse controls and spending caps are essential when the endpoint is publicly accessible.
Move from a Test Request to Production
- Create separate projects. Keep development and production consumption distinct.
- Set budgets. Configure daily and monthly project limits.
- Set a realistic output cap. Do not leave every request able to generate extremely long responses.
- Use bounded retries. Retry transient overload and server errors, not authentication or invalid-request errors.
- Track usage. Store model, prompt tokens, completion tokens, cached tokens and latency.
- Log safely. Keep request IDs and error types without recording secrets or sensitive prompts unnecessarily.
- Validate output. Use JSON validation, tests or human review according to the task.
- Monitor balance. Configure alerts before the account reaches zero.
- Review model availability. Query or monitor the current model list before a migration.
- Test failure paths. Confirm that 401, 429 and timeout errors produce a safe user experience.
Projects under one organization can have separate consumption budgets, although they share the organization’s overall balance and upper rate-limit tier.
What to Build After the First Request
| Next objective | What to learn | Related guide |
|---|---|---|
| Choose the right model | K3 vs K2.7 Code vs K2.6 | Kimi API Models |
| Estimate operating cost | Tokens, caching and tool fees | Kimi API Pricing |
| Handle failures | Error types, retries and quota | Kimi API Troubleshooting |
| Understand K3 | Context, reasoning and multimodal input | Kimi K3 Guide |
| Build a coding tool | K2.7 Code and HighSpeed | Kimi K2.7 Code Guide |
| Use switchable thinking | K2.6 thinking and non-thinking modes | Kimi K2.6 Guide |
After the basic call works, add one capability at a time: streaming, multi-turn history, structured output, files, multimodal input or tool calling. Do not combine every feature into the first production request.
Frequently Asked Questions
What is the Kimi API base URL?
Use https://api.moonshot.ai/v1 as the base URL for OpenAI-compatible SDKs on the international Kimi Open Platform.
What is the Kimi Chat Completions endpoint?
The full HTTP endpoint is https://api.moonshot.ai/v1/chat/completions.
Is the Kimi API compatible with the OpenAI SDK?
Yes. Kimi uses an OpenAI-compatible Chat Completions request and response format. Configure the Moonshot base URL and your Kimi API key. Some model Parameters remain Kimi-specific.
Which model should I use for the first Kimi API request?
The current official Quickstart recommends kimi-k3. Use K2.7 Code for coding-focused work and K2.6 for general tasks that may need switchable thinking.
Do I need to top up the Kimi API account?
The current international platform requires a successful top-up of at least $1 before inference access starts. Check available_balance before sending requests.
Can I use my Kimi Membership credits for the API?
No. Consumer membership credits and the Open Platform API balance are separate billing systems.
Why does my Kimi API key return 401?
The key may be missing, malformed, revoked or issued on a different Kimi platform. Confirm the Bearer header and match the key source with the international endpoint.
Why does Kimi return Model Not Found?
The Model ID may be misspelled, retired or unavailable to the account. Call GET /v1/models and select an ID returned for your key.
Can I call the Kimi API directly from browser JavaScript?
Do not expose a permanent API key in public frontend code. Send the request through a protected server-side endpoint with authentication, rate limiting and spending controls.
What is reasoning_content?
It is reasoning information that a thinking model may return separately from the final answer. The normal user-facing response is in message.content. Preserve complete assistant messages when implementing supported multi-turn thinking workflows.
Should I set max_completion_tokens?
Yes. An explicit limit makes cost, latency and rate-limit behavior easier to control. A small value such as 512 or 1,024 is appropriate for an initial smoke test.
Does Kimi K3 support temperature changes?
K3’s sampling values are currently fixed. Do not pass custom temperature or top_p values copied from an unrelated model tutorial.
How do I check Kimi API token usage?
Read the response’s usage object. It reports prompt, completion and total tokens and can include cached-token information.
Official Sources and Update Methodology
This tutorial prioritizes current first-party Kimi and Moonshot AI developer documentation. The principal sources reviewed were:
- Kimi API Quickstart
- Kimi API Overview, Authentication and SDK Setup
- Kimi K3 Quickstart
- Chat Completions API Reference
- Model Parameter Reference
- Current Kimi Model List
- List Models Endpoint
- Check API Balance Endpoint
- Kimi API Error Codes
- Recharge and Rate Limits
- Kimi Thinking Models and reasoning_content
- Organization, Project and API Key Best Practices
The API endpoint, access requirements, model recommendation, request Parameters and error behavior were last checked on August 29, 2026. When the live Open Platform or current first-party documentation differs from this article, follow the current official information.
Last verified: August 29, 2026.
