

Last verified: August 29, 2026
Kimi Design is Kimi’s prompt-led workspace for creating and refining visual content. It combines content generation with visual layout, allowing you to start from a written idea, reference image, existing visual, or video and turn it into assets such as social posts, posters, marketing graphics, website visuals, and creative concepts.
It is more than a basic text-to-image generator because it can also develop copy and layout, accept comments on the canvas, revise selected elements, adapt a design to different dimensions, and restore earlier versions in supported workflows. It is not, however, a replacement for every manual design editor, presentation builder, or website-development product.
Best way to think about Kimi Design: it is an AI creative studio for moving quickly from a brief to a reviewable visual—not a guarantee that the first generation is a production-ready final asset.
What is Kimi Design?
The official Kimi Design page describes the product as a way to turn ideas into polished visuals by bringing content generation and layout together.
That positioning is important. Kimi Design does not only generate a background image and leave the rest of the work to you. In supported workflows, it can interpret a creative brief, develop headlines or supporting copy, compose visual elements, select a layout direction, and let you refine the result through natural-language feedback.
The workflow is prompt-first rather than tool-first. Instead of manually drawing every shape or arranging every text box from the beginning, you describe the intended outcome, review the generated composition, and direct the next revision.
What Kimi Design is not
Several Kimi features use visual AI, but they do not own the same task.
| Name | Primary Deliverable | How It Differs from Kimi Design |
|---|---|---|
| Kimi Design | Static visual assets and design compositions | Combines generation, layout, canvas feedback, resizing, and export |
| Kimi Slides | Complete presentation decks | Builds slide structure, content, visual storytelling, and editable presentations |
| Kimi Websites | Functional websites and web applications | Generates frontend, backend, databases, interactions, preview, and deployment |
| Kimi Docs | Documents, reviews, conversions, and designed PDFs | Focuses on long-form document workflows rather than standalone marketing visuals |
| Kimi Agent | Multi-step tasks using multiple tools | Can create several artifact types as part of a broader autonomous workflow |
| Kimi Design Bench | An internal evaluation benchmark | Measures visual-input, frontend, full-stack, and creative-programming performance; it is not the Design product |
| Kimi API Vision | Image and video understanding | The documented public API analyzes visual input; it is not presented as the Kimi Design canvas |
If the required result is an editable presentation, use Kimi Slides. If it is a deployed website, use Kimi Websites. If it is a social graphic, poster, campaign visual, or image-led creative, Kimi Design is the more relevant starting point.
Kimi Design feature matrix
| Feature | What It Does | Practical Use |
|---|---|---|
| Text-to-visual generation | Builds a visual from a written description | Posters, social posts, campaign graphics, and concepts |
| Reference-image generation | Uses an uploaded image as visual direction for a new composition | Explore a related mood, composition, color language, or creative direction |
| Existing-image editing | Applies requested changes to an uploaded image | Change backgrounds, add or remove elements, recolor items, or alter style |
| Video-guided creation | Uses video as one of the supported creative inputs | Extract visual direction or develop a related static visual |
| Content and layout generation | Develops copy, visual elements, and composition from one brief | Social campaigns and promotional graphics |
| In-canvas comments | Lets the user describe changes while reviewing the design | Target specific text, image, color, or layout revisions |
| Natural-language refinement | Changes the design through follow-up instructions | Explore styles without rebuilding from scratch |
| Size adaptation | Reformats a design for another ratio or canvas | Turn a square post into a Story or widescreen banner |
| Custom dimensions | Accepts standard ratios or specific pixel dimensions | Meet website, presentation, social, or print requirements |
| Version rollback | Returns to an earlier design state in documented poster workflows | Test new directions without permanently losing the preferred draft |
| Preview and export | Lets the user inspect and download the finished visual | Prepare the asset for publishing or further editing |
Kimi’s official AI image creation guide documents generation from text, reference images, and video, as well as editing backgrounds and individual visual elements. Its design tool guide documents canvas editing, multiple aspect ratios, custom dimensions, and high-resolution output.
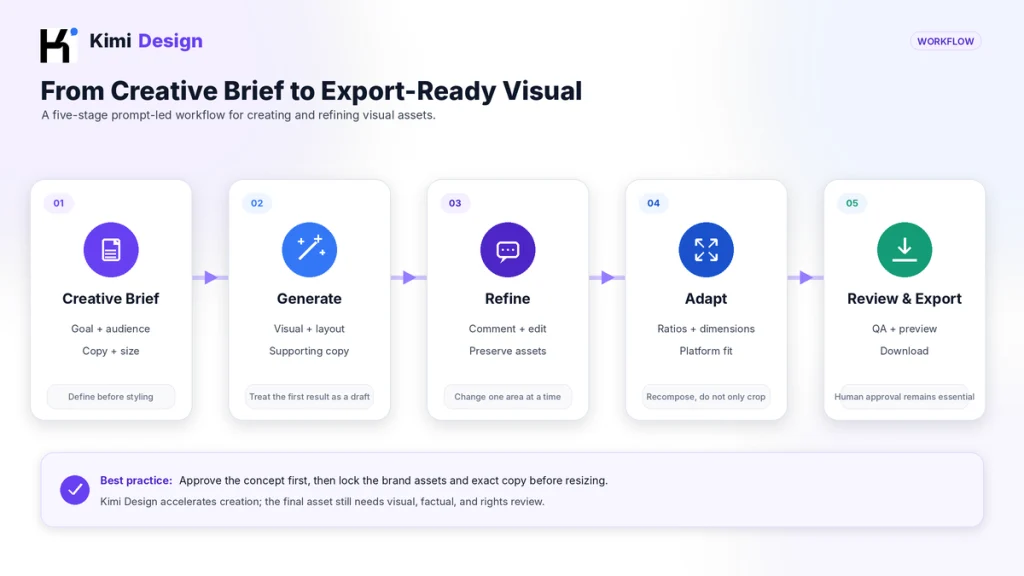
The five-stage Kimi Design workflow
A stronger result usually comes from treating visual creation as a staged review process rather than requesting one final image in a single sentence.
Stage 1: Write the creative brief
Describe the purpose of the asset before describing its appearance. A promotional post, event poster, educational infographic, and website hero image require different hierarchies even when they use the same brand colors.
A useful brief identifies:
- The business or communication goal.
- The target audience.
- The platform or placement.
- The exact headline, supporting copy, and call to action.
- The required size or aspect ratio.
- The desired visual direction.
- The assets that must be used.
- The elements that must remain unchanged.
- The styles or mistakes to avoid.
Stage 2: Generate the first composition
Kimi Design interprets the brief and creates an initial design direction. Depending on the request, this can include generated imagery, typography, layout, color treatment, headline placement, supporting text, and a call to action.
Treat this result as a visual proposal. First check whether the composition understood the goal, not whether every small detail is already perfect.
Stage 3: Refine through the canvas
The official workflow supports comments and natural-language revisions. Instead of regenerating everything, identify the element that needs work and state what should change and what should remain intact.
- “Keep the product image unchanged, but replace the background with a warm studio scene.”
- “Make the headline shorter and increase its contrast without moving the logo.”
- “Remove the decorative shapes behind the call-to-action button.”
- “Reduce the amount of text and create more whitespace around the product.”
- “Use the original brand blue and do not recolor the uploaded logo.”
Stage 4: Adapt the format
Once the design direction is approved, adapt it for each required placement. Official Kimi materials describe support for common ratios such as 1:1, 16:9, 9:16, 4:3, and 3:4, custom pixel dimensions, and poster formats including A3 and A4.
Resizing should not be treated as a mechanical crop. A square post, vertical Story, widescreen banner, and printed poster have different reading distances and safe areas. Review hierarchy and text size after every adaptation.
Stage 5: Review and export
Preview the final visual at the size in which it will actually be used. Read every line, inspect the logo, check the edges, and confirm that important elements are not clipped or merged.
Kimi’s public guides describe previewing and exporting or downloading the completed result. They do not currently publish one universal matrix of export file types or guarantee editable vector or layered source files across every workflow. Confirm the available options in the product interface before promising a specific deliverable to a client.
What can you create with Kimi Design?
| Asset Type | Useful Inputs | Recommended Review Focus |
|---|---|---|
| Social media post | Campaign goal, platform, copy, palette, and reference imagery | Small-screen readability, safe areas, and CTA clarity |
| Event poster | Event name, date, location, audience, style, and print size | Information hierarchy, text accuracy, and print margins |
| Product promotion | Product photograph, benefits, offer, brand rules, and CTA | Product fidelity, logo accuracy, and truthful claims |
| Website banner | Page purpose, dimensions, headline, visual focus, and button area | Text placement, responsive cropping, and contrast |
| Presentation visual | Slide purpose, message, aspect ratio, and deck style | Compatibility with the deck and room for surrounding content |
| Educational graphic | Concept, facts, sequence, audience level, and labels | Factual accuracy and logical reading order |
| Creative concept | Mood, subject, lighting, materials, camera direction, and references | Originality, visual coherence, and alignment with the brief |
| Campaign variation | Approved master design and target channel dimensions | Brand consistency across all versions |
The official Kimi social-media workflow says the product can generate coordinated headlines, captions, layouts, and visual elements from one campaign brief. The official poster resources also document comment-based editing, resizing, and earlier-version recovery.
Inputs you can give Kimi Design

A text-only brief
Use text when you are starting from an idea. Specify the purpose, content, visual language, composition, and dimensions rather than naming only a subject.
A reference image
A reference can communicate composition, mood, lighting, palette, or material treatment more efficiently than a long description. State which characteristics should guide the new design and which content must remain original.
An image that needs editing
When editing an existing image, identify the protected elements explicitly. A good edit request separates the change from the preserve list:
Change:
- Replace the background with a clean light-gray studio.
- Remove the small object in the lower-right corner.
- Add a soft natural shadow beneath the product.

Preserve:
- The product shape and proportions.
- The original label and logo.
- The camera angle.
- The existing highlight and material texture.
A video reference
Kimi’s image-creation materials list video among the possible inputs. Use it to communicate movement, atmosphere, framing, or visual direction, but review the resulting static composition independently rather than assuming an exact frame reproduction.
Brand assets
Upload the original logo, approved palette, typography guidance, and examples of existing materials when brand fidelity matters. Do not ask the model to recreate a logo from memory when the official file is available.
Kimi publishes an official Brand Book for its own identity, illustrating the value of defined logo geometry, color, typography, grids, and visual rules. Apply the same principle to your own brand brief.
A reusable Kimi Design prompt framework
Use the following structure instead of a one-line request:
Goal:
Create a [type of visual] for [business or communication objective].

Audience:
The design is for [target audience].

Placement:
It will be used on [platform, page, campaign, or print format].

Canvas:
Use [aspect ratio or exact dimensions].

Required copy:
Headline: [...]
Supporting text: [...]
Call to action: [...]

Visual direction:
Use [style, mood, palette, typography, photography or illustration direction].

Assets:
Use the uploaded [logo, product image, screenshot, reference image, or video].

Preserve:
Keep [elements that must not change].

Avoid:
Do not use [unwanted colors, layouts, effects, clichés, or visual errors].

Quality checks:
Keep text readable, preserve logo proportions, avoid overlapping elements,
maintain safe margins, and produce a clean final composition.
The framework turns subjective taste into testable requirements. It also makes later revisions easier because you can identify whether the problem came from the message, layout, imagery, branding, or technical format.
Three Kimi Design prompt examples
Social media launch post
Create a 1080 × 1080 Instagram post announcing the launch of a
productivity app for freelance designers.

Audience: independent creative professionals aged 22–40.

Required copy:
Headline: "Your Projects, Finally in One Place"
Supporting line: "Plan, track, review, and deliver without losing the creative flow."
CTA: "Start Free"

Visual direction:
Modern editorial layout, off-white background, dark navy typography,
one electric-blue accent, generous whitespace, and one subtle grid motif.

Use the uploaded app screenshot as the main visual.
Keep the screenshot and uploaded logo unchanged.
Do not add extra copy, fake ratings, gradients, or overlapping elements.
Event poster
Create an A3 portrait poster for a public technology workshop.

Event name: "Designing with AI Without Losing Your Taste"
Date: October 18, 2026
Time: 6:00 PM
Location: Central Creative Hub
CTA: "Reserve Your Seat"

Use a bold Swiss-inspired editorial layout with strong typography,
black and warm white as the base colors, and one violet accent.
Create a clear hierarchy: event name first, date and location second,
CTA third.

Keep all event information exactly as written.
Use wide print-safe margins and avoid small decorative text.
Reference-image transformation
Use the uploaded image as a reference for lighting, material treatment,
camera angle, and minimal composition.

Create a new original 16:9 website hero visual featuring a smart desk lamp
in a calm nighttime workspace.

Keep the reference's soft side lighting and restrained color palette,
but do not reproduce its exact objects or composition.
Leave clear negative space on the left for a headline.
Do not generate text or logos inside the image.
How to edit Kimi Design results more precisely
Separate global revisions from local revisions.
| Revision Type | Example Instruction |
|---|---|
| Global style | “Change the full design from playful to restrained editorial minimalism.” |
| Color system | “Use only the uploaded brand colors and preserve their contrast roles.” |
| Typography | “Reduce the headline to two lines and increase the spacing below it.” |
| Single element | “Remove the icon next to the CTA and leave the rest unchanged.” |
| Image placement | “Move the product to the right third and preserve its scale.” |
| Copy | “Replace the supporting sentence with the exact text below; do not rewrite it.” |
| Format | “Create a 9:16 Story version using the same visual system, not a simple crop.” |
| Preservation | “Do not redraw, recolor, stretch, or place elements over the logo.” |
When the new direction is worse, use the documented version rollback where available instead of trying to describe the earlier design from memory.
Canvas sizes, ratios, and export expectations
Kimi’s official design resources mention:
- 1:1 square layouts.
- 16:9 widescreen layouts.
- 9:16 vertical layouts.
- 4:3 and 3:4 formats.
- Custom pixel dimensions.
- Example resolutions such as 1080 × 1080 and 1280 × 720.
- Poster adaptation for A3 and A4.
- High-resolution output.
The exact export options can depend on the current interface and workflow. The public documentation reviewed for this article does not provide a complete, permanent file-format table or promise layered PSD, editable SVG, or another specific source format.
Before starting client work, run a small export test and confirm:
- The actual pixel dimensions.
- The downloaded file format.
- Whether transparency is preserved.
- Whether text remains editable.
- Whether the color profile suits print or screen.
- Whether the output needs further work in another editor.
How to maintain brand consistency
- Use the original logo file. Do not rely on an AI-redrawn approximation.
- State the protected area. Tell Kimi not to place text, shapes, or images over the logo.
- Provide exact colors. Include HEX, RGB, or CMYK values when they matter.
- Describe typography roles. Define headline, body, caption, and CTA hierarchy.
- Upload approved examples. Show the visual system rather than describing it only with adjectives.
- Lock the copy. Mark legal text, prices, product names, dates, and claims as exact.
- Create one master first. Approve the core design before generating platform variations.
- Compare all exports together. Check that the campaign still looks like one visual family.
AI can accelerate exploration, but brand consistency still depends on the quality of the rules and assets supplied by the user.
Kimi Design access, pricing, and credits
The direct official entry point is the Kimi Design page. Sign in with the Kimi account requested by the product interface and check the current usage meter before starting a large batch.
Kimi’s current membership overview explains that membership features generally draw from a shared credit pool. However, the public page does not publish a separate Kimi Design row, a fixed cost per generated visual, or a guaranteed number of monthly designs.
For that reason, do not describe Kimi Design as unlimited or promise a fixed free allowance without checking the current product interface. Credits, availability, task cost, and plan entitlements can change. The internal Kimi AI pricing guide should own the broader consumer membership discussion.
Which model powers Kimi Design?
The official public materials reviewed for this article do not identify one specific image-generation model behind Kimi Design. They describe the product’s workflow and outputs, but they do not provide a technical model card for the visual generator.
Do not assume that Kimi Design is directly powered by Kimi K3, Kimi K2.6, or a named third-party image model unless Kimi publishes that relationship explicitly. Kimi’s language and vision models can understand visual input, but visual understanding is not automatically the same as the model that renders the final design.
Is there a public Kimi Design API?
The current Kimi Open Platform documentation focuses on Chat Completions, reasoning, coding, tools, and text, image, and video understanding. The documentation reviewed for this article does not publish a dedicated Kimi Design generation endpoint or an API that reproduces the Design canvas workflow.
A developer can use Kimi models to analyze design briefs, inspect images, plan layouts, or call external tools, but that should not be presented as an official Kimi Design API unless a dedicated endpoint is documented later.
Privacy and rights when using visual references
Kimi’s current international Privacy Policy includes prompts, images, videos, files, and generated content within User Content. It says this information can be processed to provide and improve the services, including training and optimizing AI models, depending on the applicable legal basis and jurisdiction.
- Do not upload confidential client campaigns without authorization.
- Remove personal data that is not needed for the design.
- Confirm that you have permission to use reference images, product photos, faces, logos, and trademarks.
- Do not treat an AI result as automatic copyright or trademark clearance.
- Review commercial-use terms that apply to your account and region.
- Use a suitable enterprise or contractual workflow for sensitive business assets.
For a broader discussion of account, file, and privacy differences, see the internal Is Kimi AI safe? guide.
The five-gate visual QA check
Do not approve the asset only because it looks attractive at first glance.
Gate 1: Message accuracy
- Is every word spelled correctly?
- Are dates, prices, names, statistics, and CTAs exact?
- Did the tool invent a claim or additional copy?
- Can the main idea be understood quickly?
Gate 2: Visual hierarchy
- Is the primary message clearly first?
- Is the supporting content readable without competing with the headline?
- Is there enough whitespace?
- Are text blocks, images, and icons separated rather than overlapping?
Gate 3: Asset fidelity
- Is the logo the original file rather than a generated imitation?
- Are its proportions and colors unchanged?
- Does the product retain its real shape, label, and packaging?
- Are hands, faces, objects, and materials visually coherent?
Gate 4: Platform and export
- Are the dimensions correct?
- Does the design remain readable on a phone?
- Are important elements inside safe areas?
- Is the output format suitable for the publishing workflow?
- Does a print asset have enough resolution and margin?
Gate 5: Rights and privacy
- Do you have permission to use every uploaded asset?
- Does the image include a real person, protected character, or trademark requiring review?
- Was confidential information accidentally included?
- Has a human approved the final commercial use?
When is Kimi Design the right tool?
| Need | Recommended Starting Point |
|---|---|
| Turn a brief into a fast visual concept | Kimi Design |
| Create a social post with copy and visuals together | Kimi Design |
| Generate and refine an event poster | Kimi Design |
| Edit an existing image using instructions | Kimi Design |
| Adapt one creative direction to several ratios | Kimi Design, followed by manual QA |
| Create a complete editable presentation | Kimi Slides |
| Build and deploy a functioning website | Kimi Websites |
| Create a long designed report or document | Kimi Docs |
| Control every vector layer and anchor point manually | A conventional professional design editor may be more appropriate |
| Manage large template libraries, team workflows, or strict production systems | Evaluate Kimi Design alongside a dedicated collaborative design platform |
Kimi Design is strongest when speed, exploration, and natural-language iteration matter. Traditional design software remains valuable when the project requires deterministic layer control, specialist prepress work, complex collaboration, or a precisely governed production system.
Frequently asked questions
What is Kimi Design?
Kimi Design is Kimi’s AI visual-creation workspace. It combines content generation and layout to create and refine assets such as images, posters, social posts, marketing graphics, and website visuals.
Can Kimi Design generate images from text?
Yes. Its official guides document text-to-image and prompt-to-design workflows. A detailed brief can include the subject, style, colors, layout, text, audience, platform, and dimensions.
Can Kimi Design edit an existing image?
Yes. You can upload an existing image and describe changes such as replacing the background, removing or adding elements, changing colors, or modifying the overall style. State which elements must remain unchanged.
Can Kimi Design use a reference image?
Yes. An uploaded reference image can guide visual atmosphere, composition, color, lighting, and style. The prompt should distinguish between qualities to follow and content that should remain original.
Does Kimi Design support video input?
Kimi’s official image-creation guide lists text, images, and videos as possible inputs for creating new visuals. The exact handling and available controls can change with the product interface.
Which image sizes does Kimi Design support?
Official resources describe common ratios including 1:1, 16:9, 9:16, 4:3, and 3:4, custom pixel dimensions, and poster adaptation for A3 and A4. Check the current canvas for the exact available options.
Is Kimi Design free?
The public documentation reviewed for this article does not publish one permanent Kimi Design free quota or fixed task price. Check the current account interface and membership credit meter before starting a large project.
Does Kimi Design have a public API?
The current Kimi Open Platform documentation reviewed for this article does not list a dedicated public endpoint that reproduces Kimi Design generation and canvas editing. The documented API focuses on language-model inference, reasoning, tools, coding, and visual understanding.
Is Kimi Design the same as Kimi Design Bench?
No. Kimi Design is a visual-creation product. Kimi Design Bench is an internal benchmark referenced in Kimi’s model research for evaluating visual and design-related software tasks.
Can Kimi Design replace Canva or Figma?
It can replace part of the early creative and iteration workflow when prompt-led generation is sufficient. A dedicated editor may still be preferable for precise layer control, extensive template libraries, governed brand systems, complex collaboration, or production-ready UI design.
Official sources and update methodology
This article was verified on August 29, 2026. Product positioning and access were checked against the official Kimi Design page. Image generation, reference-image input, editing, canvas refinement, sizes, poster workflows, social-media generation, and version rollback were checked against Kimi’s official resource guides. Membership and privacy statements were checked against the current Kimi Help Center and international Privacy Policy.
- Official Kimi Design Page
- How to Create AI Images with Kimi Design
- Kimi AI Design Tool Features
- Create Social Media Posts with Kimi Design
- Kimi Design Poster Features
- Kimi Design Social Media Capabilities
- Official Kimi Brand Book
- Kimi Membership Overview
- Kimi International Privacy Policy
- Kimi Open Platform Documentation
- Kimi K2.6 and Kimi Design Bench
Kimi Design is a new and evolving product. Features, account access, credits, supported inputs, export formats, and editing controls may change. Check the official product interface and documentation before promising a specific deliverable, quota, or file format.
Related internal resources: explore Kimi Agent, learn about Kimi Docs, review Kimi Slides, compare current Kimi membership plans, or read the Kimi privacy and safety guide.
